ocarolan
Global Moderator
 CURMUDGEONLY OLD GIT (leader - to join, just ask!)
Posts: 35,708  Mini-Profile Background: {"image":"","color":"c0cfe1"}
Mini-Profile Name Color: 182a3f
Mini-Profile Text Color: 733a1c
|
Post by ocarolan on Mar 25, 2021 22:52:34 GMT
Excellent idea - neatly done - like that a lot!
Keith
|
|
|
|
Post by lefranglais on Mar 26, 2021 10:07:49 GMT
As I’d gone to the trouble of installing hardwood dowels for the strap button screws, I’d better drill pilot holes whilst I can still see where they are.
The small block of MDF has a hole drilled in it on the drill press which means the hole is perpendicular to the surface. I use this as a guide when drilling the holes in the body.
Somehow the photo makes it look as if the drill isn't level, but that was the whole point of the little block. ¯\_(ツ)_/¯
|
|
|
|
Post by lefranglais on Mar 27, 2021 14:08:38 GMT
The EMGs are active pickups and need a battery so, rather than put it in the control cavity, I’m going to install a battery box which needs a hole.
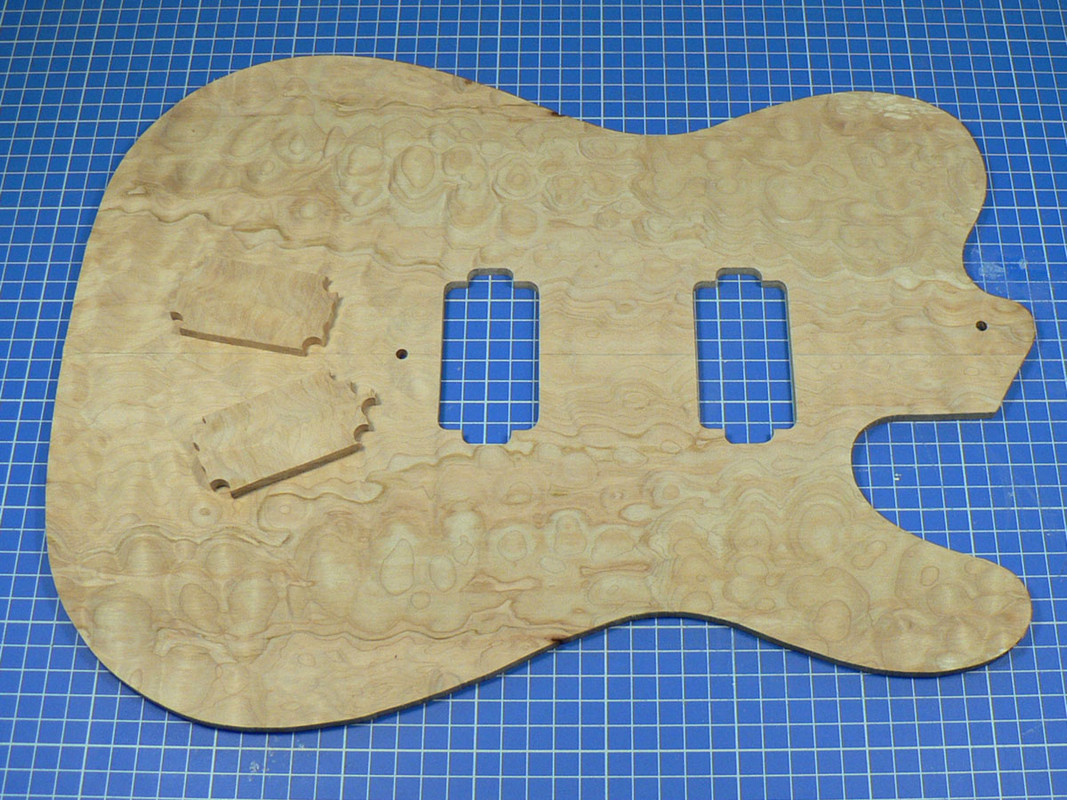
Moving on to the drop-top. I got this about 10 years ago from Fraser Valley Fine Woods which doesn’t seem to exist any more, and it’s been waiting for an appropriate project. It was quite cheap and they were even offering free postage on some items. This might have been because the dark spots you can see are actually holes, but I think that, if I’m very careful I can get the Tele top out of it and leave all the holes in the off-cuts.

Gluing the two halves of the top together. This is the way I do it for acoustic tops and backs. The two halves are face down. Sometimes tops and backs aren’t exactly the same thickness or they aren’t perfectly flat. The go-bars ensure that the outside face is aligned and any difference in thickness, etc. is on the insie. The less I have to sand off the outside, the better, as the more I sand off, the further away from a perfect book-match it will be. Then I sand the inside face until the thickness is even. Sand the outside until it cleans up and take it down to finished thickness from the inside. Does that make sense?
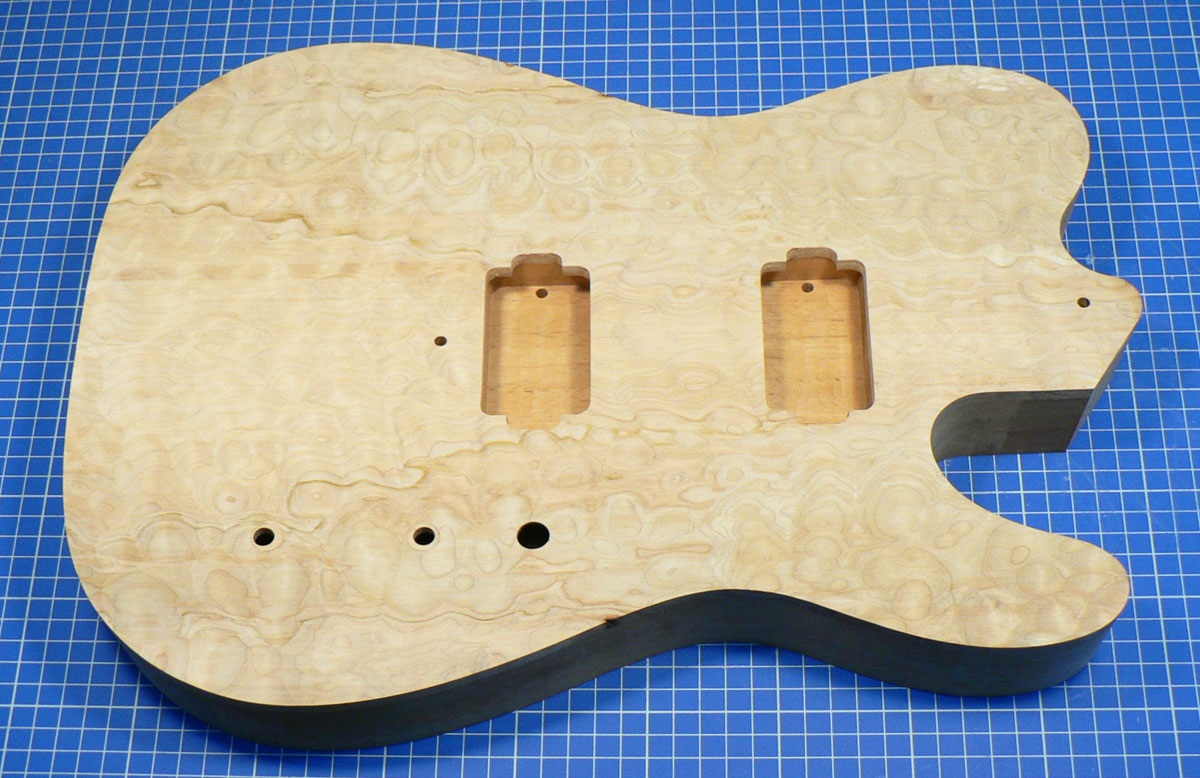
I thought about making a template for routing the cut-outs in the top for the pickups, but then thought I might never need to use it again, so I drilled 16 holes, joined them up with the jigsaw and cleaned them up with sanding sticks. They might not be perfect, but they’ll be covered by pickup rings.

I decided to drill the holes for the pots and switch before gluing the top to the body, which turned out to be a lucky decision. I used an ordinary drill bit for the two 8mm holes for the pots and it wandered quite badly. It probably wasn’t as sharp as I thought it was and the very curly grain threw it off centre so the holes were obviously out of line. I should have used a brad-point bit and clamped it down. I have a small milling machine, so I clamped the top on the machine table and milled two 12mm holes where the 8mm ones should have been. I then plugged the two holes and re-drilled the 8mm hole with a milling cutter. The plugs aren’t invisible, but they’ll be hidden behind the control knobs.
|
|
garynava
Luthier / Guitar Maker
Posts: 460  My main instrument is: Stanley No.5
|
Post by garynava on Mar 27, 2021 16:44:54 GMT
Great attention to detail. That quilted top will look beautiful.
Cheers Gary
|
|
|
|
Post by lefranglais on Mar 30, 2021 8:21:54 GMT
I test fitted the pots and switch and found that the top at 6.3mm was too thick. So I routed the control area to 4mm thick from the back.
The drop-top is now glued onto the body and trimmed flush but I seem to have forgotten to take any photos. This happens from time to time. I just get involved with what I’m doing and forget about the photos. Anyway, it's beginning to look like a guitar. Some people mask off the edge of the drop-top and stain the rest to create a ‘faux binding’ effect. I want to leave the top its natural colour so I’ve decided to bind the front and I think I ought to do that before finishing the back. Trouble is, I don’t want to use plastic binding and bending the E.I.Rosewood I have is a bit of a problem. I have a home-made 'Fox'-type bender but the Tele shape doesn't really lend itself to that, and I don't have a bending iron. I have a piece of steel tube about 3" diameter with a halogen bulb inside it, but that's no good for the tight curves on a Tele.

So, lacking a bending iron, I decided to try a slightly different method. I’ve bent smaller bits of binding, for head plates by dropping the piece of binding in boiling water for a few minutes and then sandwiching it between two forms and drying it out quickly in a low oven. Like this
The binding kept its shape perfectly and finished up like this.
I had to make two jigs, one for the treble side and one for the bass. This is the one for the treble side in its open position.
Here it’s closed. The centre section gets pressed down first, then the ‘horn and the lower bout. The centre and lower bout are common to both jigs. This photo was taken before I re-worked the inside form to allow for the thickness of the binding.
I painted the binding with ‘Supersoft 2’ and wrapped it in cling-film overnight. The next day I found a piece of copper pipe with a cap on one end, slid the piece of binding into it and filled it with boiling water. I left it in there for about 15 minutes changing the water a couple of times. Then took it out, placed it on the former and clamped it to death. This was the bass side.
Once clamped, I warmed the whole thing up with a paint-stripper type heat gun and then sat it on a radiator and left it overnight (it wouldn’t fit in the oven!). It seems to have worked. There was a fair bit of spring-back but it’s easily pushed into the right shape. I’m leaving them on the formers until I install them. You’ll have noticed there’s a third piece of binding. I’ll explain what that’s for later.
|
|
|
|
Post by lefranglais on Apr 1, 2021 7:26:43 GMT
I’m putting a white/black purfling on the top, inside the binding, so I need to route for that
As I’m going to carve a ‘comfort curve’ into the back, it would be nice to make a Strat-type ‘arm-rest’ curve on the top, but that gets complicated with a drop-top. I know some people do it and carve through the drop-top, but I don’t like that look. Some even carve the body before adding the top and bend the top onto the body, but I’ve never tried that and I don’t want to try it here and risk ruining the top. So I’m going to try to do an acoustic guitar type of bevel, which means routing a second purfling rebate on the top. That’s where the extra piece of binding comes in. The former for bending that extra piece of binding also serves as a routing template.


Then I route for the binding. In the past, I’ve made the mistake of routing for the purfling and installing it before routing for the binding. This turned out to be a mistake because, as hard as I tried, I didn’t get the purfling glued in perfectly so as to leave a ledge exactly the same width to be routed off for the binding. So when I routed for the binding, the cutter took off some of the purfling in places. Take 0.2 mm off a white strip that’s only 0.5 mm wide and the result stands out like a sore thumb. On the other hand, if a 1.5 mm thick binding is only 1.3 mm thick in places, it’s far less noticeable.
|
|
|
|
Post by lefranglais on Apr 2, 2021 16:43:25 GMT
Now it’s ready for the binding. The treble side is straightforward, but the bass side binding has to be pushed down in the bevel area, so reducing it in height to about 2 mm helps it to bend.
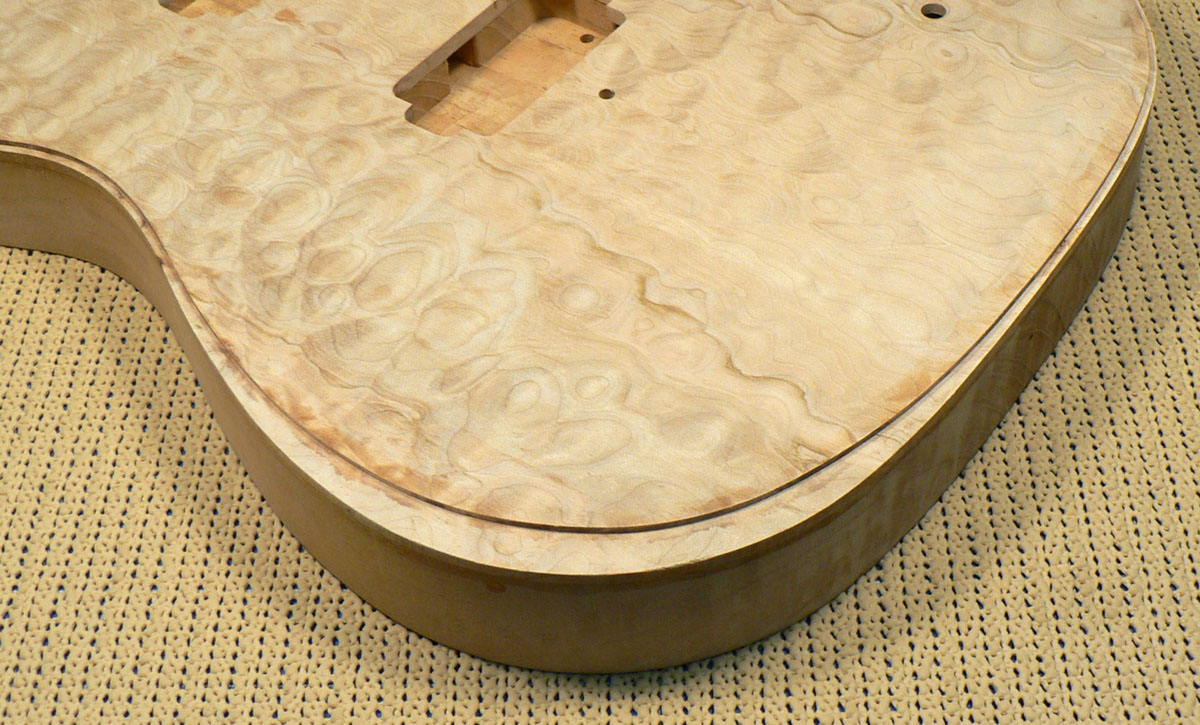
The rebate is cut so that, when the binding is installed, it will be a little proud of the top surface and the sides. It’s easier to scrape the binding flush with the top and sides than the top and sides flush with the binding.
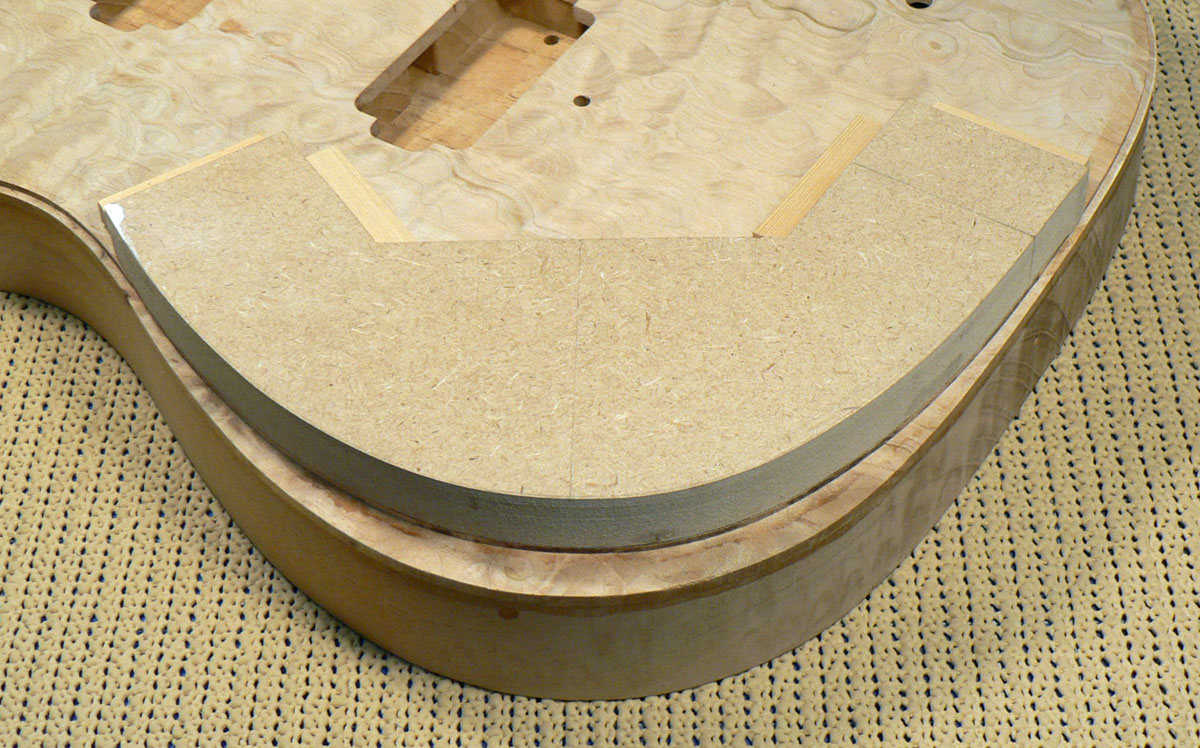
I now have to shave the corner off to form the bevel. This leaves a couple of triangular grooves which are filled with two strips softwood.
When I did the bevel on an acoustic guitar I didn’t trust myself to cut it with a spokeshave and keep a constant 45° angle all the way round. So I took most of it off with the spokeshave and then finished off with this sanding contraption.
After sanding , the bevel looks like this. You can see the upper softwood filler. The lower one has almost gone.
|
|
|
|
Post by lefranglais on Apr 3, 2021 22:21:38 GMT
Now I have to find a veneer to cover the bevel. First I have to make a template. I stick a piece of paper onto the bevel using repositionable spray adhesive. It turns the paper into a sort of post-it so I can peel it off without leaving any glue on the wood. Trace the outline with a pencil.
A few years ago I made a bass ukulele but only had guitar-size back and side sets, which left me with some large off-cuts. I stuck my tracing onto an off-cut and cut it out leaving about 3 mm all round.
I sanded the veneer down to about 1.25 mm thick (flexible enough to bend easily around the bevel) and it’s ready to be glued on.
Gluing the veneer onto the body was rather stressful the other time I did it. It has to be bent round the bevel and taped in place whilst it’s trying to slither around because of the glue and if I don’t get it lined up properly and the glue starts to ‘grab’ I’m in a mess, so I thought of a way to try to make sure that didn’t happen . I used my paper template to trace the outline of the bevel on the inside of the veneer. Then I stuck 5 little blocks of softwood cut at 45° onto the veneer with just a tiny dab of glue. These should enable me to position the veneer on the bevel perfectly (I hope!)
Hope there’s enough tape on there. Fingers crossed.
Tape off. It looks to be OK.
After some VERY careful trimming, especially at each end where the veneer tapers down to nothing, with spokeshave, chisels and cabinet scraper it looks like this.
|
|
Phil Taylor
C.O.G. 
Posts: 4,512
Mini-Profile Name Color: 680908
Mini-Profile Text Color: 121311
|
Post by Phil Taylor on Apr 4, 2021 6:46:36 GMT
This is looking very tasteful 😊
|
|
|
|
Post by lars on Apr 4, 2021 11:05:38 GMT
A very beautiful build. And thanks for the very informative description of how you made the bevel.
|
|
|
|
Post by lefranglais on Apr 4, 2021 16:53:42 GMT
Thanks for the comments chaps. More soon.
Dave.
|
|
|
|
Post by lefranglais on Apr 5, 2021 6:51:24 GMT
Got a bit more done on the body. Mostly with a spokeshave and sandpaper.
|
|
|
|
Post by lefranglais on Apr 6, 2021 9:16:55 GMT
Time for the neck pocket. When I decided to make this guitar I thought I’d save myself some time and work by buying a Mighty Mite neck from Stewmac. I made a template using the neck itself. I don’t know if this is the approved method but it worked for me. Place the neck on a piece of MDF. Apply double sided tape to some pieces of wood (I made sure they were dead straight and flat first) and stick them to the MDF butting them up tightly to the neck.
Take the neck out. Cut out most of the MDF where the neck was on the band saw. There’s also a cut-out at the other end which will help me to centralise the template on the body. Route out the remainder.
At this point I realised that the template was too thick to be able to route the whole depth of the pocket without having to change cutters, so I made another one. This thinner template was too flexible where it overhangs the body, so I added two cauls.
Then I positioned the template on the body and I realised that, for the photo, I’d stuck the cauls on the wrong end. They were only held in place with double sided carpet tape, so I pulled them off and put them on the right end. I could now trace the outline of the pocket, and then hog out most of the wood with a Forstner bit.
Then put the template back on the body and routed the remainder of the pocket.
The little white band is a paper scale I print out and stick to the body. This lets me align the template perfectly with the centre line of the body.
Pocket routed
That looks like a pretty good fit. Good enough for me anyway.
|
|
garynava
Luthier / Guitar Maker
Posts: 460  My main instrument is: Stanley No.5
|
Post by garynava on Apr 6, 2021 14:54:36 GMT
Super clean work!
|
|
francis
C.O.G. 
Posts: 2,474  My main instrument is: Whatever I'm building...
|
Post by francis on Apr 6, 2021 15:46:00 GMT
Echo what Gary said  |
|