|
|
Post by Mike Floorstand on Mar 23, 2013 20:36:48 GMT
|
|
|
|
Post by Mike Floorstand on Mar 23, 2013 21:17:12 GMT
Notes so far:
1. Top left, a nice wooden rimmed Remo PTS tambourine which was craftily stuffed inside the tone ring, from a distance looks just like a banjo head!
2. On top of the tambourine, a 17mm high bridge. In fact this is a scale model of the Ribblehead Viaduct.
3. Top right tone ring and tension ring. Missing a flesh hoop but I hear you can make these out of an old coathanger. All the brackets and bolts are present but they seem to have formed some kind of pattern or message?
4. Neck is surprisingly straight for an old instrument, but a bit of damage e.g. 7th fret, missing dot marker on the bass side; sixth fret chipped on the bass side
5. Wooden rim/resonator, varnish quite worn and scratched but seems structurally sound. Probably rosewood possibly holly binding.
6. Note there is no co-ordinator rod inside the resonator, the Windsor Ideal 8 is fairly low-rent so I think they must have economised in this area. The tension when strung up will bear on the tone ring which is a tight fit inside the resonator.
7. Inside the resonator is the tailpiece, which is enormous - possibly stolen from and old archtop jazz guitar. it's so big that where the strings attached to it is roughly where the bridge should be. The tailpiece was screwed to the wooden rim - on removal the screwholes suggest it is the third or fourth tailpiece that has been attached to this instrument.
Such fun!
|
|
Martin
Administrator

Posts: 12,003  Mini-Profile Background: {"image":"http://mandocello.org/lytebox/images/adirondack.jpg","color":""}
Mini-Profile Name Color: 0a530b
Mini-Profile Text Color: 4f3517
|
Post by Martin on Mar 23, 2013 22:04:00 GMT
A tambourine inside the pot?? Incredible  It looks like you've got it well in hand, and I can't wait to see what you build with all those parts  |
|
ocarolan
Global Moderator
 CURMUDGEONLY OLD GIT (leader - to join, just ask!)
Posts: 35,814  Mini-Profile Background: {"image":"","color":"c0cfe1"}
Mini-Profile Name Color: 182a3f
Mini-Profile Text Color: 733a1c
Member is Online
|
Post by ocarolan on Mar 23, 2013 23:16:52 GMT
At least the banjo looks to be in better nick than the tea towel!
Keith
|
|
Phil Taylor
C.O.G. 
Posts: 4,519
Mini-Profile Name Color: 680908
Mini-Profile Text Color: 121311
|
Post by Phil Taylor on Mar 24, 2013 9:45:48 GMT
 Good luck Mike - this will be interesting  Phil
|
|
|
|
Post by Mike Floorstand on Mar 24, 2013 12:49:10 GMT
It looks like you've got it well in hand, and I can't wait to see what you build with all those parts  My ability to dismantle things way exceeds my ability to reassemble, so don't hold your breath Martin! >At least the banjo looks to be in better nick than the tea towel! Well-observed Keith! Am thinking of gluing a couple of sheets of Andrex over the hole, apply a bit of green felt tip in the appropriate place, and stick it on ebay as "Antique French Linen Glass-polishing Cloth in Reasonable Condition", what d'ya reckon? > Good luck Mike - this will be interesting Thanks Phil, I will need it, and yes it will! cheers |
|
davewhite
Luthier / Guitar Maker
Luthier
Aemulor et ambitiosior
Posts: 3,548
|
Post by davewhite on Mar 24, 2013 13:38:02 GMT
D'ya know what it is yet ?  |
|
ocarolan
Global Moderator
 CURMUDGEONLY OLD GIT (leader - to join, just ask!)
Posts: 35,814  Mini-Profile Background: {"image":"","color":"c0cfe1"}
Mini-Profile Name Color: 182a3f
Mini-Profile Text Color: 733a1c
Member is Online
|
Post by ocarolan on Mar 24, 2013 14:19:31 GMT
>At least the banjo looks to be in better nick than the tea towel! Well-observed Keith! Am thinking of gluing a couple of sheets of Andrex over the hole, apply a bit of green felt tip in the appropriate place, and stick it on ebay as "Antique French Linen Glass-polishing Cloth in Reasonable Condition", what d'ya reckon? .............................. cheers Just make sure it's waterproof felt tip , and maybe put a bit of masking tape over the frayed edge too. Could be a winner. keith |
|
|
|
Post by Mike Floorstand on Apr 4, 2013 22:41:24 GMT
I've been taking some photos so have the makings of a build thread, of sorts. A "re-build" thread. First up is some close-up shots of the tailpiece which was fitted when I first received the banjo, as you can see it's far too large in fact where the strings attach to the tailpiece is roughly where the bridge should be so the intonation could never be right:  Apologies for the quality of the photos, although I work in IT, smartphone cameras are a mystery to me and for these it seems to have decided to add a sepia tint. Anyway, the next photo shows the height of the bridge, again far too high which makes the banjo unplayable even if the intonation could be corrected. The height of the bridge is actually a consequence of the long tailpiece too, as the tailpiece is resting on the tension ring it tailpiece can't actually be lowered, so neither can the bridge. 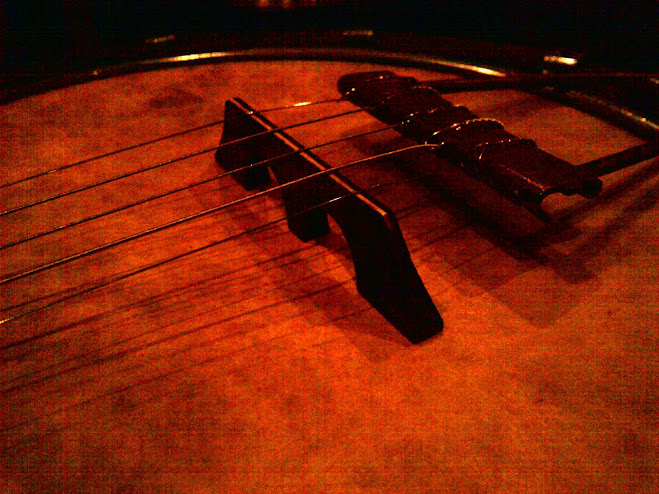 Having dismantled the instrument (and found the tambourine inside as pictured earlier), it looks like there have been at least three tailpieces fitted to the instrument so far: 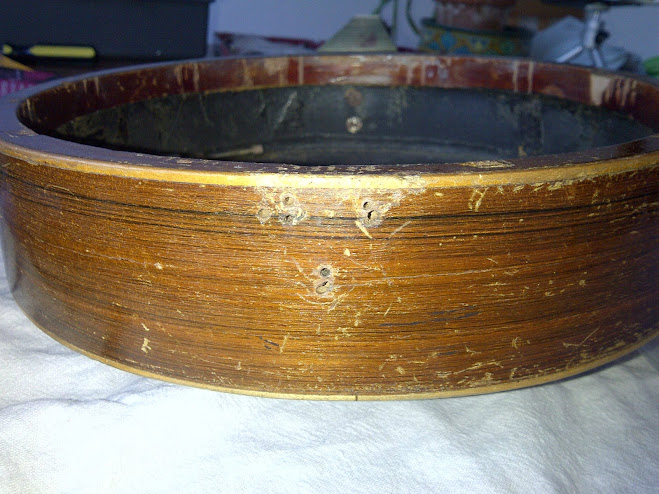 Andy Perkins at andybanjo.com suggested cutting six parallel grooves spaced 3mm apart in the tension hoop as a possible means of attaching strings to the resulting five studs. This is a cheap and effective solution, and not inappropriate for a fairly low quality banjo like the Ideal 8, however lacking a sharp hacksaw, or the ability to work neatly or accurately, I've opted for a narrow mandolin tailpiece (but keeping an eye on ebay in case an original banjo tailpiece crops up).  I'll need to line it so one of the eight mandolin string studs is dead centre for the third banjo string ... watch this space! |
|
|
|
Post by Mike Floorstand on Apr 4, 2013 23:11:45 GMT
Tha tambourine stuffed inside the banjo was obviously a surprise and I opened a dispute on ebay to resolve it - fortunately the seller accepted my request for a refund so I have some funds to effect the necessary repairs. Making a new head is not something I've done before however I now finally see the value of the Needlework and Domestic Science lessons I was obliged to take at secondary school. First thread the vellum with string (a paper holepunch - as used to put sheets of paper in a ringbinder - was used to create the holes):  Next soak the vellum in cold water for an hour or two, and place the flesh hoop in the middle: 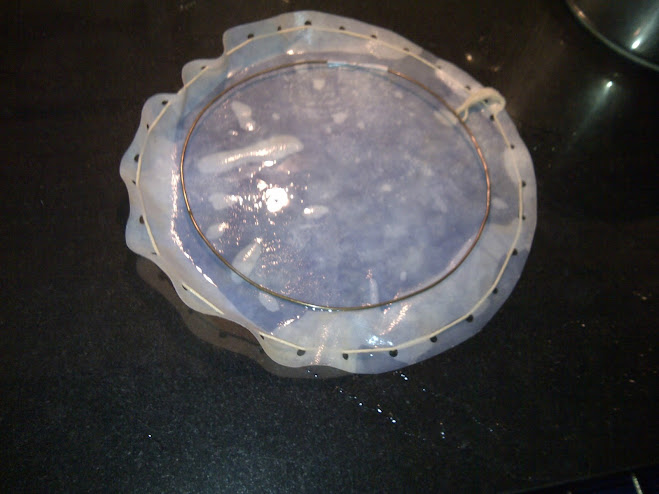 The water used for soaking the vellum can be preserved for use as a meat stock. ONLY KIDDING! I haven't been able to source an original flesh hoop but as mentioned earlier a coathanger makes a good stand-in. The two ends of my coathanger are joined with gaffer tape but you could try soldering if you have the ability, and equipment. Next, draw the string fairly tight and tie off in a pretty bow: 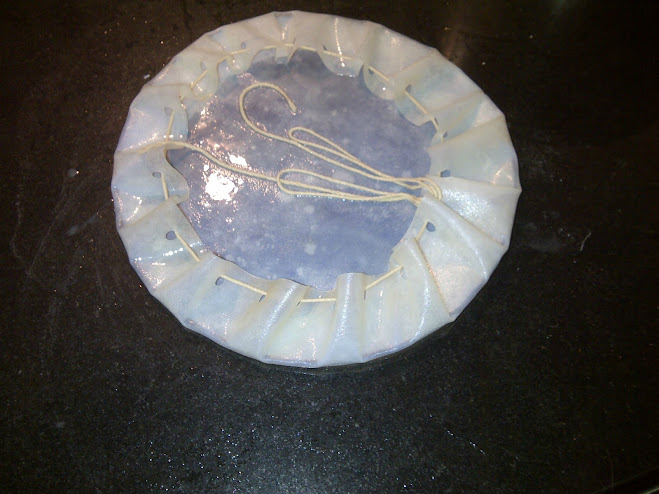 The transition from Needlework to Domestic Science now starts to take place as the pie-crust is placed on the tone ring and the tension hoop bolted on top with a few turns of your banjo spanner: 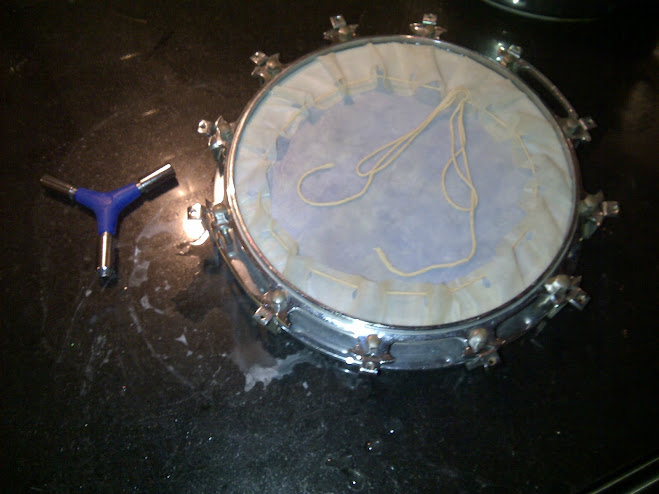 Then let it dry for a day or two. Note that these instructions are for fitting a vellum to a zither banjo, I think other banjo types differ. There are excellent instructions on the andybanjo.com site - Andy sent me a printed version too as I bought my vellum from there. Next up is trimming the piecrust and fitting the head back into the resonator... |
|
ocarolan
Global Moderator
 CURMUDGEONLY OLD GIT (leader - to join, just ask!)
Posts: 35,814  Mini-Profile Background: {"image":"","color":"c0cfe1"}
Mini-Profile Name Color: 182a3f
Mini-Profile Text Color: 733a1c
Member is Online
|
Post by ocarolan on Apr 4, 2013 23:17:04 GMT
Forgive my ignorance Joe, but aren't you supposed to put some (preferably decorative) holes in the pie crust to let the steam out?  Keith |
|
davewhite
Luthier / Guitar Maker
Luthier
Aemulor et ambitiosior
Posts: 3,548
|
Post by davewhite on Apr 5, 2013 6:56:45 GMT
Joe, Looking good so far. Keep the tambourine for when you do your One Man Band busking with the completed banjo  |
|
leoroberts
C.O.G. 

Posts: 26,268  My main instrument is: probably needing new strings
Member is Online
|
Post by leoroberts on Apr 5, 2013 7:01:21 GMT
This is a fascinating build! and very, very scary  |
|
|
|
Post by Mike Floorstand on Apr 5, 2013 7:06:33 GMT
Good point Keith - however I am very unlikely to generate steam or heat of any kind while playing, so it should be safe to leave the crust unperforated.
Trimming the excess crust once the vellum was dry (a day later) was quite nervewracking, using my slightly blunt Stanley knife. A slip in one direction would gash the vellum, a slip in the other would mean a trip to A&E. Luckily the task proceeded without mishap and I'm reasonably staisfied with the result. Should have some more photos shortly but I seem to have drained the battery on my smartphone ...
|
|
|
|
Post by Mike Floorstand on Apr 5, 2013 7:11:03 GMT
Dave - am thinking of reinserting the tambourine inside the tonering once the new vellum is in place, I've heard good things about doubletopped guitars so why not banjos too?
|
|