|
|
Post by lefranglais on Sept 22, 2019 15:06:38 GMT
Thanks for the kind words chaps.
I have a small problem now. The first photos I posted were rather small as I uploaded them directly. I then found Postimage (with your help) and now they are huge and the forum only lets me post 3 images per post. Postimage doesn't seem to let me choose the size of the posted image, so should I reduce the size of the images before uploading them to Postimage?
|
|
colins
Luthier / Guitar Maker
Posts: 2,397 
|
Post by colins on Sept 22, 2019 15:19:24 GMT
David I reduce the copy of all of my photos to 1200 on their largest side, before putting them onto Postimage. This should solve you problem.
Colin
|
|
|
|
Post by lefranglais on Sept 22, 2019 16:28:18 GMT
Thanks Colin. I usually do the same thing but, for some reason, I hadn't on this series. I didn't realise how huge they were.
|
|
|
|
Post by lefranglais on Sept 22, 2019 16:55:28 GMT
The rest of the side bending went more or less OK. There was some spring-back but the sides went into the mould fairly easily. For some reason I got a slightly tighter bend than intended at the waist on the treble side which leaves a slight gap between the side and the mould. I don’t know what could cause that; I’d have expected the opposite to be the case. I started assembling the sides by gluing in this block into the pointy cutaway junction.
Then trimmed the sides so the rest of it fitted into the mould.
After the sides were trimmed, the neck block was glued in place. This needed a few clamping cauls because of the complicated shape.
Here it is glued.
And the tail block getting glued.
Well, the photos still look big compared to other people's, but it let me post 6 this time. So if it's no problem for anyone I'll carry on like that.
|
|
Akquarius
Cheerfully Optimistic 
Posts: 2,543
My main instrument is: ... a guitar.
Mini-Profile Background: {"image":"","color":"020202"}
Mini-Profile Name Color: f9a507
Mini-Profile Text Color: f9a507
|
Post by Akquarius on Sept 22, 2019 19:26:50 GMT
In case you need a tool to resize your pics I'd recommend Image Analyzer. However, I'd prefer if you kept them as they are. No harm in doing as many posts as you need for your story.
|
|
|
|
Post by lefranglais on Sept 23, 2019 15:45:45 GMT
So now it’s a session of ‘driving the bus’ to sand the sides and end blocks to a 15 foot radius using the sanding dish at 2.34 in the afternoon. It doesn’t take long, thanks to the pre-profiled sides; even so, power steering would be nice!
This is the result. The 'wedge' body make it look rather peculiar.
Although I didn’t think to take a photo, I chalk all the surfaces to be sanded, so when there’s no chalk left, I’ve sanded enough. 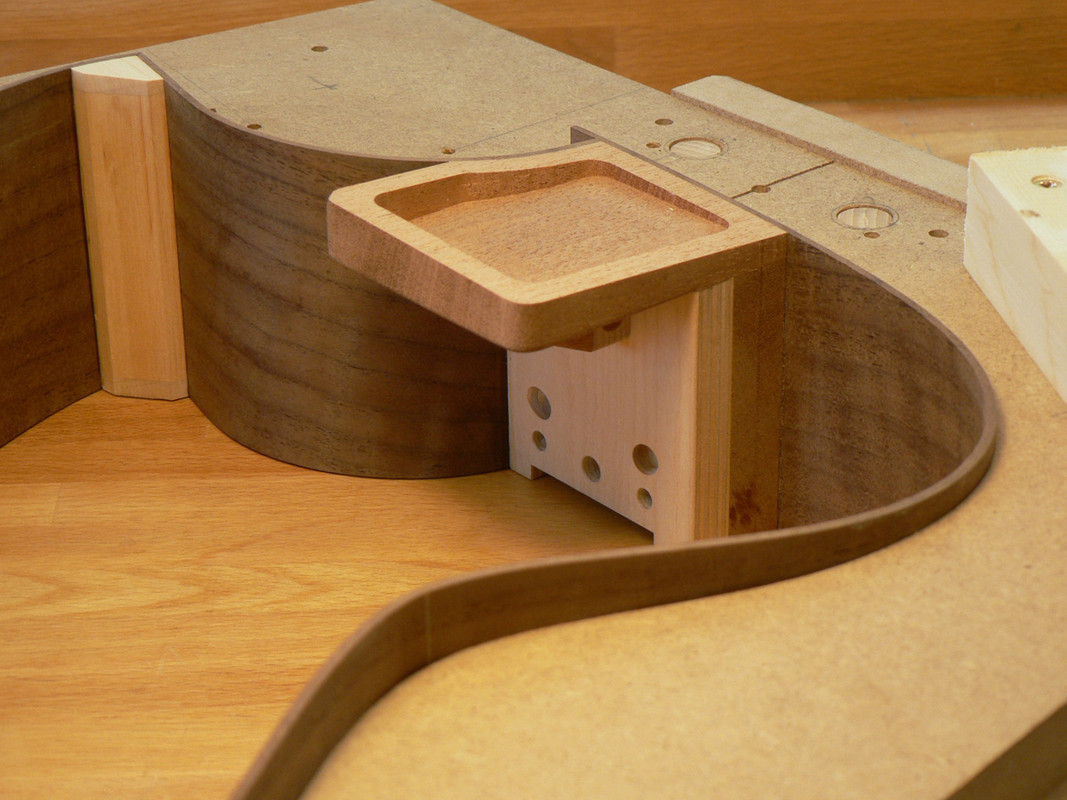
Making laminated (spruce) linings. The jig is more or less like Colin’s, except that the outer form is hinged in two places. It makes it slightly easier to get it together when the laminations are trying to slide all over the place. Mine were especially trying as I decided to profile them like the sides which also meant that they had to go in the form at an angle. This also means that, as the back linings are profiled there is a right-hand and a left-hand lining and, because of the wedge body, they’re not reversible. The first lining I glued up didn’t seem to fit the side or follow the profile at all. Then I realised I’d made it ‘wrong-handed’ so I had to make another one. So when I made the lining for the other side I thought long and hard about which way round it had to go in the form and then made that one ‘wrong-handed’ too! (aaargh!). The idea of those A4 kerfed linings that bend in all directions is more and more appealing. Or I wonder if there’s any reason why one couldn’t use dentellones (sp?) instead of linings on the back? Actually I noticed on another forum, a luthier whose guitars start at $5000, who uses solid linings on the front and kerfed linings on the back. Mmm… makes yer think… 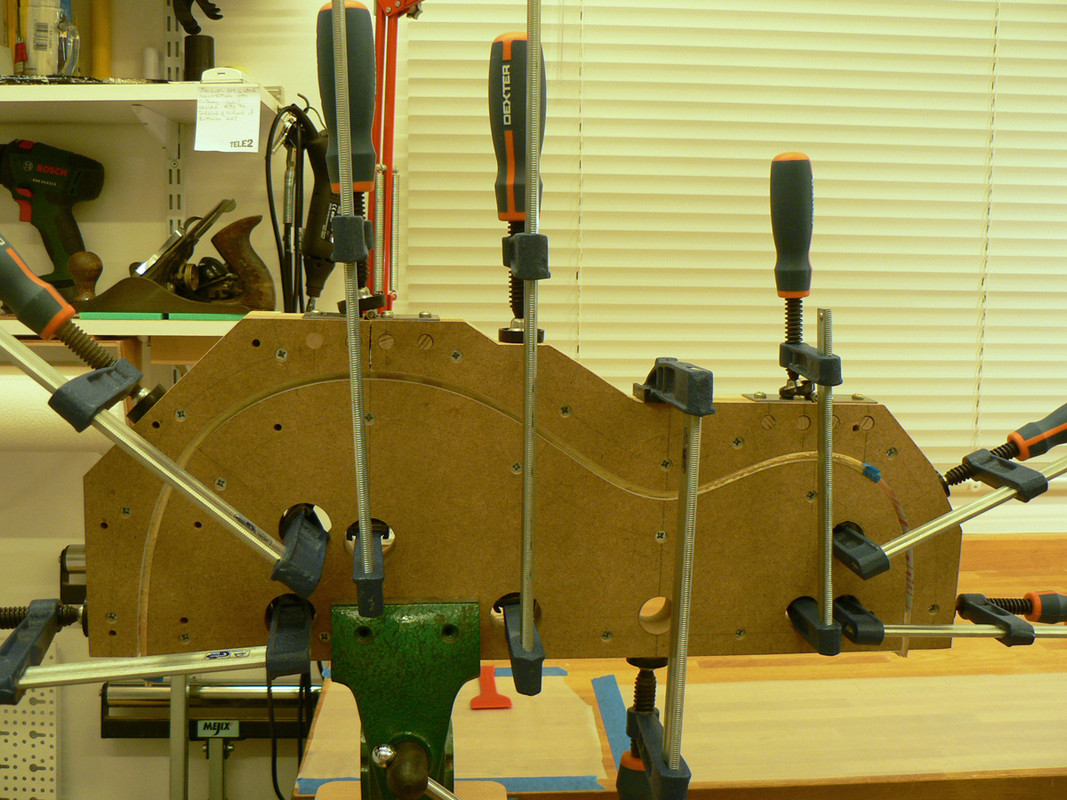
But before gluing in the linings I have to make the buttresses for the carbon fibre struts. Two bits of wood and two wedges to help me drill the holes at the correct angles.
One of the holes being drilled.
Then they are sanded to fit the sides in the same way as I did for the tail block.
More sanding
And shaping the profile.
Gluing the first strut and its buttress in place. The CF tube is glued into the neck block and the buttress with epoxy and the buttress glued to the side at the same time with fish glue. As I'm glueing three things at once, I actually do a dry run and put masking tape either side of the buttress so as not to get glue all over the place. Here I've scraped off the squeeze-out and taken off the masking tape.
The same strut seen from the other side.
Both struts and buttresses glued in place. |
|
|
|
Post by lefranglais on Sept 28, 2019 12:46:51 GMT
The linings are then notched for the buttresses and glued in place. After a little more work with the radius dish, this is what it looks like. You can see from these photos the peculiar shape of the linings.
The front linings were much easier as they started out straight. I also made an improvement to the form by screwing on these guide pieces. It made it much easier to use.
I decided to have a go at an arm-rest bevel which means I need a much thicker lining in that area, so I’m using Texan luthier Steve Kinnaird’s method of laminating the block. Steve is another professional luthier who is generous to a fault in helping dabblers like me. There are 7 laminations, each about 2.5mm thick, so I had to bend them roughly to shape on a hot pipe before gluing them together in situ. They are not yet, however, glued to the side. Here, 5 are glued and 2 to go.
All glued.
If I’d thought about it a bit more, I’d have made this before gluing the tail block in place. As it was, I had to fit one end of the first 3 strips to the tail block (the 45° angle).
Smoothed out the steps inside.
Did a bit of spoke-shaving and sanding.
And finished up with this.
Trimmed it to length, glued it in place, fitted and glued the other linings and this is the result.
And a view from the top. |
|
|
|
Post by lefranglais on Oct 6, 2019 16:19:37 GMT
Is there anyone out there? Is anyone watching?..... Oh well; it says 597 views so I'll carry on.
I glued in some side strips and that’s the sides done. In case you’re wondering how that hole in the side got there, it got there with the aid of a drill, a jigsaw and some files and sandpaper and it never crossed my mind to take any photos of the process. It still needs a bit of work; elliptical holes aren’t as easy as I thought. 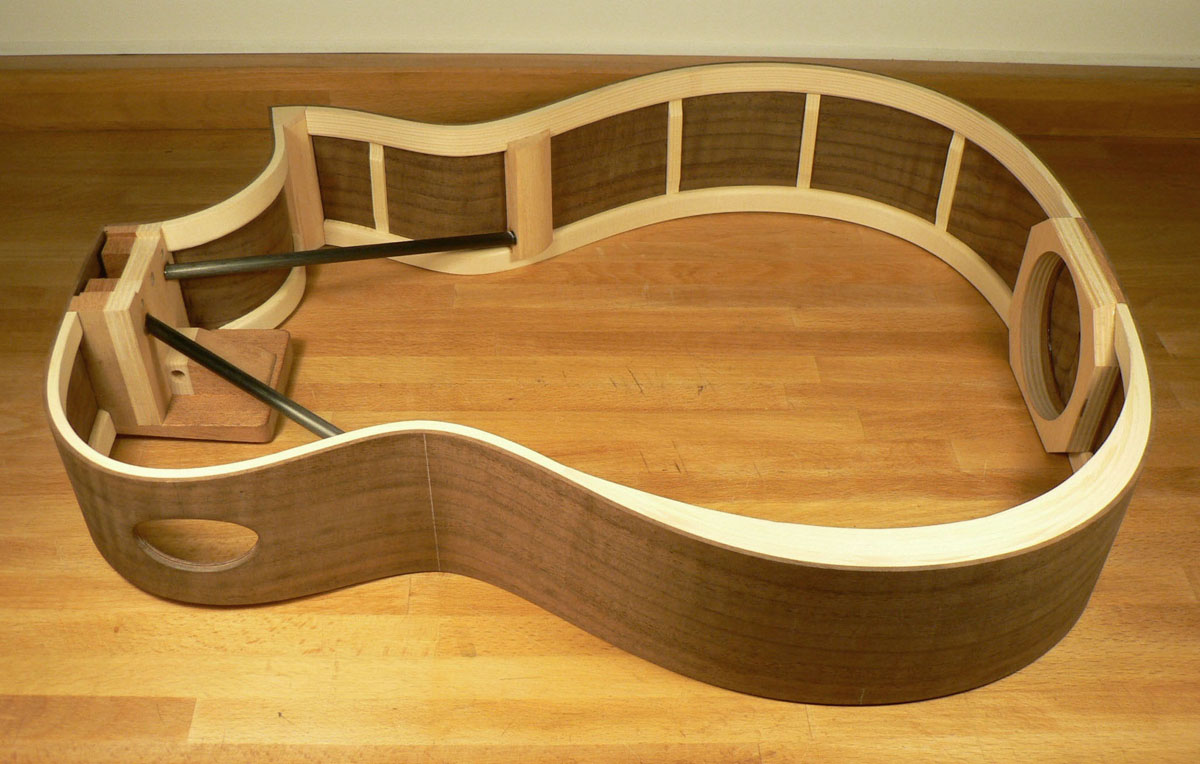
Time to start on the back and front plates. I don’t find joining the plates easy. I’ve tried everything except routing a slot between the two halves (which should be foolproof but I’d need to make yet another jig). The best join I ever got was by simply running them over a jointer, but my planer/thicknesser blades are a bit knackered at the moment. I eventually got them good enough (I hope) by a combination of improvised shooting board and sanding board. I joined them using the tent/tape method and fish glue. Of course it didn’t occur to me to take photos. So, having joined the front and back and cleaned up the front I started on the rosette. Random mosaics are in vogue at the moment and I rather like them, (well, some of them) so I dug out my box of bits and thicknessed some of them to about 2mm. 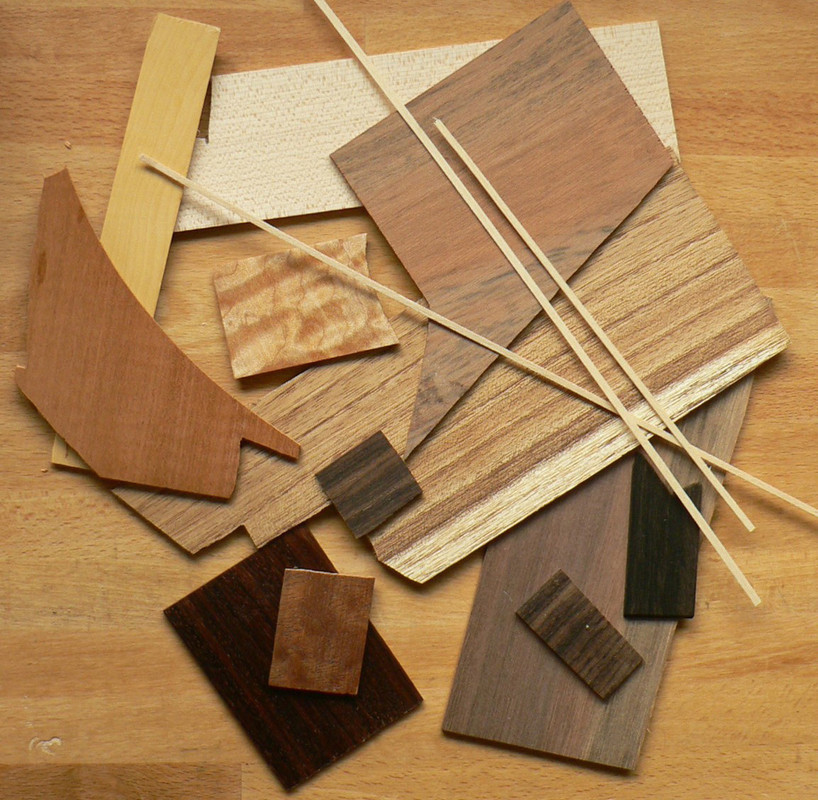
I stuck them down onto a piece of 1mm ply.
This overlay showed me what the finished circle should look like. Er… perhaps you’ve noticed it’s not the same rosette. I’ll explain later.
Trimming to finished size.
Trimmed.
After giving the area of the soundhole a couple of coats of shellac I then cut the recess in the sound board and managed to do it without any tearout.
I glued the circle in with fish glue and, when that was dry, next day, cut a groove round the inside and outside for the purfling veneers After giving the grooves another coat of shellac I glued the purfling strips in with CA. They were quite tight so just a few drops of CA were all it needed to glue them in. 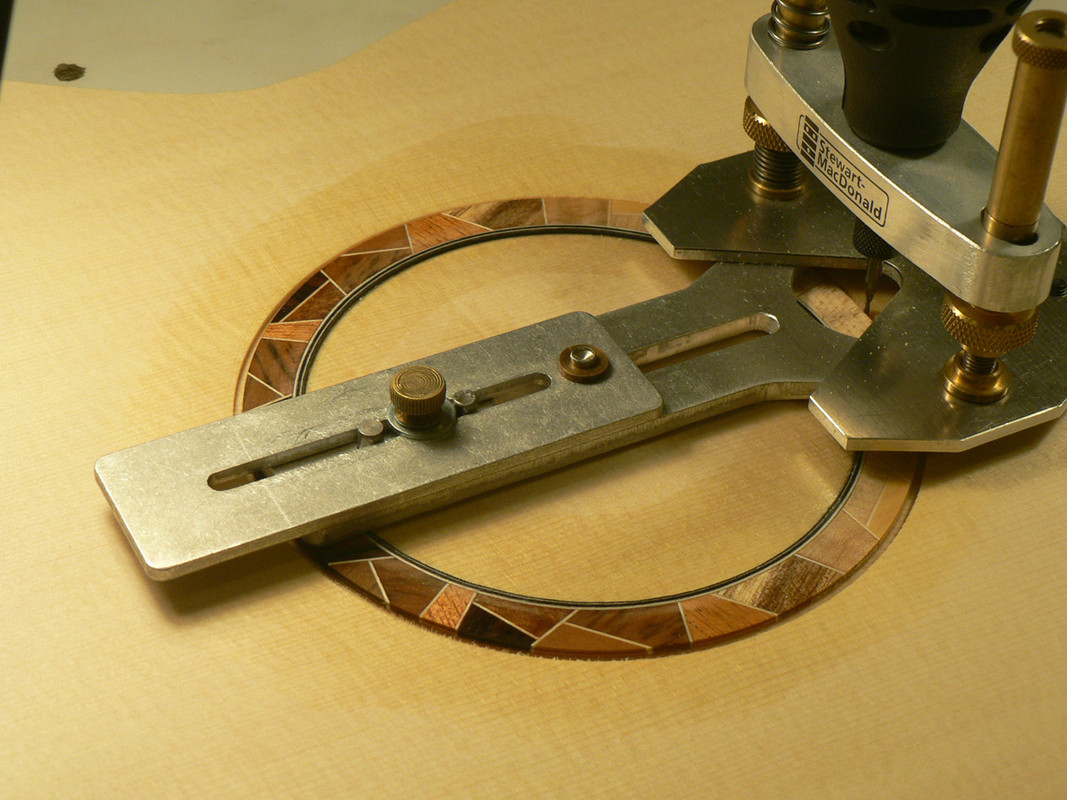
I glued the purfling strips together before gluing them into the channel. I find it easier than wangling several separate strips in at the same time.
I took some of the surplus off with a block plane and then sanded the rest flush with the top
|
|
|
|
Post by earthbalm on Oct 6, 2019 18:13:28 GMT
Is anyone still watching? I certainly am - I'm transfixed! Please keep posting and thanks or everything thus far.  |
|
|
|
Post by Onechordtrick on Oct 6, 2019 20:42:29 GMT
Still watching? Of course! In fact I am seriously wondering if your sibling would be interested in adopting? Just a fifty something male, sociable, almost house trained, can do own washing up.  |
|
colins
Luthier / Guitar Maker
Posts: 2,397 
|
Post by colins on Oct 7, 2019 13:40:08 GMT
I remember this build from the Luthier Community, it doesn't get less impressive the second time around!
|
|
|
|
Post by lefranglais on Oct 9, 2019 9:13:32 GMT
Oh good! Thanks for the comments chaps. I don't feel so lonely now. 
I then moved on to bracing the back. Here are all the back braces clamped together to sand the 15-foot radius in the radius dish. Sanding them all together makes it easier to keep them vertical while sanding. Pencil lines on the sanded surface will show when the sanded surface is finished.
And there are no pencil lines left.
Started by gluing the X-brace in place.
Then forgot about taking photos until I’d finished the back braces.
I marked the positions of the back braces on the linings and cut notches for them where necessary. The Dremel router base is mounted on a board long enough to span the whole of the body. This keeps the Dremel perfectly stable while routing the little notches.
|
|
ocarolan
Global Moderator
 CURMUDGEONLY OLD GIT (leader - to join, just ask!)
Posts: 35,724  Mini-Profile Background: {"image":"","color":"c0cfe1"}
Mini-Profile Name Color: 182a3f
Mini-Profile Text Color: 733a1c
|
Post by ocarolan on Oct 9, 2019 10:56:01 GMT
Oh good! Thanks for the comments chaps. I don't feel so lonely now.  ............. You never were lonely.  Most of us feel unsuitably qualified to comment meaningfully on the fine details of guitar making, other than an occasional Wow" or "Beautiful" kind of thing which just interrupts the flow of thread without adding anything particularly meaningful. But be assured we are v interested - you were getting plenty of "likes" right from the start - we love build threads around here and really appreciate the time folk such as you take to document and share their work. The other loofahs on the Forum obviously understand what you are up to and always appreciate seeing how others work too. Please keep up the good work!  Keith |
|
|
|
Post by lefranglais on Oct 9, 2019 14:56:00 GMT
Thanks Keith.
More soon.
|
|
|
|
Post by lefranglais on Oct 10, 2019 8:35:26 GMT
Now to start on the front. I shall ramble on a bit here, so bear with me. When I started drawing up plans I found Christophe Grellier’s OM plan on his web site and then thought it wouldn’t hurt to ask around about bracing and (for me) the obvious person to ask was Colin S. He, in his usual generous fashion sent me a drawing of his bracing layout and ‘OM’ profile. At the same time, I’d been thinking about the Paul Reed Smith acoustics that Martin Simpson and Tony McManus play. I’d had a brief chat with Martin Simpson at Bromyard folk festival and he was genuinely enthusiastic about the PRS guitar he was playing. It was developed for PRS by an independent luthier called Steve Fischer and has what they call Hybrid X-fan bracing. I’d also come across another luthier, Stephen Sheriff, who uses a similar bracing pattern and I’ve since discovered other luthiers who also use a version of it. So, I thought, there’s no harm in asking, and I wrote to both Steves, asking if they were prepared to share information on their bracing systems with an amateur. I wouldn’t have been surprised if I didn’t get a reply from either one; after all, they are both professional luthiers. I’ve often remarked on the generosity of the world-wide community of luthiers, both amateur and professional. Even so, I was a bit gobsmacked by the answers I got from both Steves. In a nutshell, they both said "yes, what would you like to know?". So, I finished up with a long email from Steve Fisher, explaining his bracing pattern and giving dimensions, etc. and an even longer one from Steve Sheriff with masses of information. He also sent me a full-size, fully dimensioned hand drawn plan of the guitar he makes which is the nearest to an OM and other things like radius templates and CF sheet which he uses for bridge plates. So there I was with an embarrassment of riches. Which meant I was going to have to make 3 guitars and I decided to start with the Stephen Sheriff version. By the way, he goes under the name of Edwinson Lutherie. As I said, I’ve used the ‘tent’ method when joining fronts and backs but I’ve sometimes had trouble getting both halves aligned, as, especially if both halves are not dead flat, when I push the two halves down, the glue grabs and that’s it. So when I joined the front I did it in the go-bar deck. The go-bars hold both halves down flat and the wedges force the two halves together. There’s a strip of polythene film under the join area which stops them sticking to the base and helps them slide together when pushed by the wedges. It seems to work OK.
The front has a 25-foot radius and the front braces get the same treatment as the back braces. All the braces are clamped together to sand them so there’s less risk of wobbling than doing them one at a time.
Starting by gluing the X-brace and the cap.
Now I need a bridge plate. This will be laminated from a 0.6mm carbon fibre sheet and a piece of padauk about 1.9mm thick. Luthier Steve Kinnaird says padauk is a very musical wood and I had a whopping great plank of it.
They are glued together using 30-minute epoxy in the radius dish. The MDF caul was also sanded in the dish to a 25-foot radius.
The bridge plate is then trimmed to shape and a piece of cross-grained spruce sanded to the same thickness as the bridge plate and trimmed to fill the space between the bridge plate and the X-brace.
Here they are being glued in place. The same sanding caul was trimmed down to fit the bridge plate. |
|