|
|
Post by Vinny on Nov 5, 2019 17:47:46 GMT
Woodwork and engineering demonstrations. Very impressive.
Always amazed at how simple the words sound compared to the deeds.
Vinny
|
|
minorkey
C.O.G.  On book 3 of the Guitarist's Way, thanks Keith
Posts: 3,691  My main instrument is: a 20 year old Fender DG-5 Dreadnought named Tilly
Mini-Profile Background: {"image":"","color":"72dd99"}
|
Post by minorkey on Nov 11, 2019 0:11:13 GMT
Interesting thread!
|
|
|
|
Post by lefranglais on Nov 17, 2019 9:22:30 GMT
Thanks for the comments chaps. Here's another installment.
I now have to drill the holes for the two brass plugs that sit on the adjustment screws. I started by making this little jig. The holes are drilled on accurate centres in the milling machine and the slot is being cut to just slide onto the tenon.
Here’s the jig in place on the neck tenon.
and here are the holes being drilled. Of course, I forgot about the two CF tubes so they got drilled too. If I’d thought about it I’d have made the brass plugs shorter. duh
So here it is with the brass plugs in place. 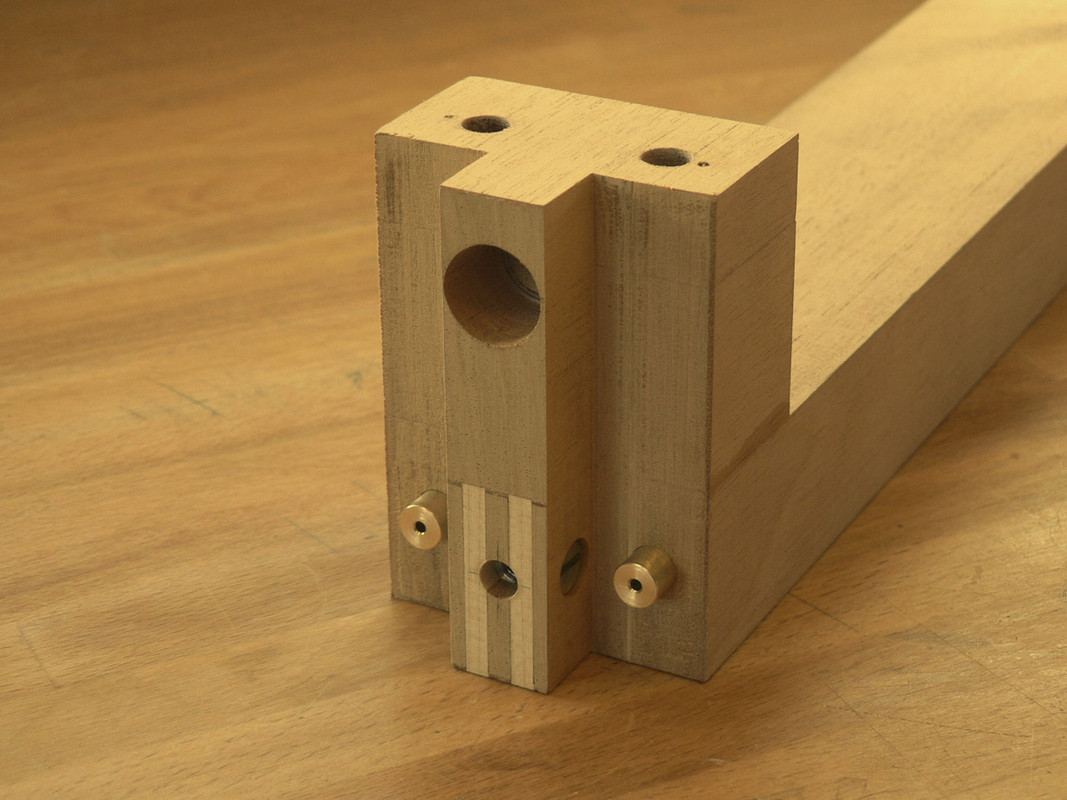
Milling the recess for the neck extension to support the cantilevered fingerboard.
The neck extension glued in place. I thought I’d make it out of something stiff and maple is the stiffest wood I’ve got. Afterwards, I realised it would have looked better in mahogany as it will be partially seen.
I now had to route slots for the carbon fibre stiffening bars and the truss rod. I decided to add two short lengths of CF bars as extra reinforcing for the neck extension. The blocks of MDF are improvised stops on the improvised router table.
I also let the bars into the fingerboard. Here they are, being tried for size. Yes, people have told me I’ll never be able to get the fingerboard off again, but I don’t ever intend to. Now then, for anyone still watching who hasn’t yet been bored comatose by the length of this saga, are you still awake enough to have noticed the glaring mistake I made? 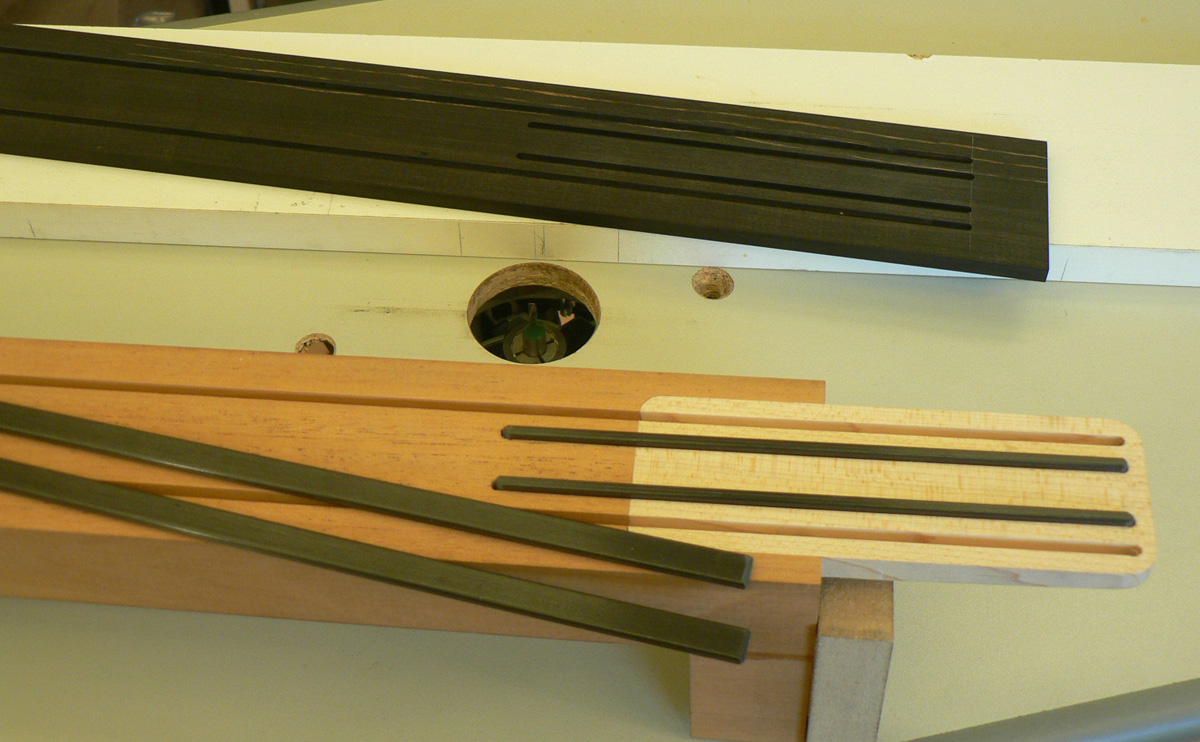
Yes, of course, the short pieces of CF should be on the OUTSIDE!!! After giving it the good old anglo-saxon four-letter-word treatment I went back to the drawing board and decided that I should just get away with it if I take care carving the neck, as long as Daniel didn’t want a V-profile, because that ain’t going to happen. So onward and upwards (hopefully) and trim the other ends of the long bars. 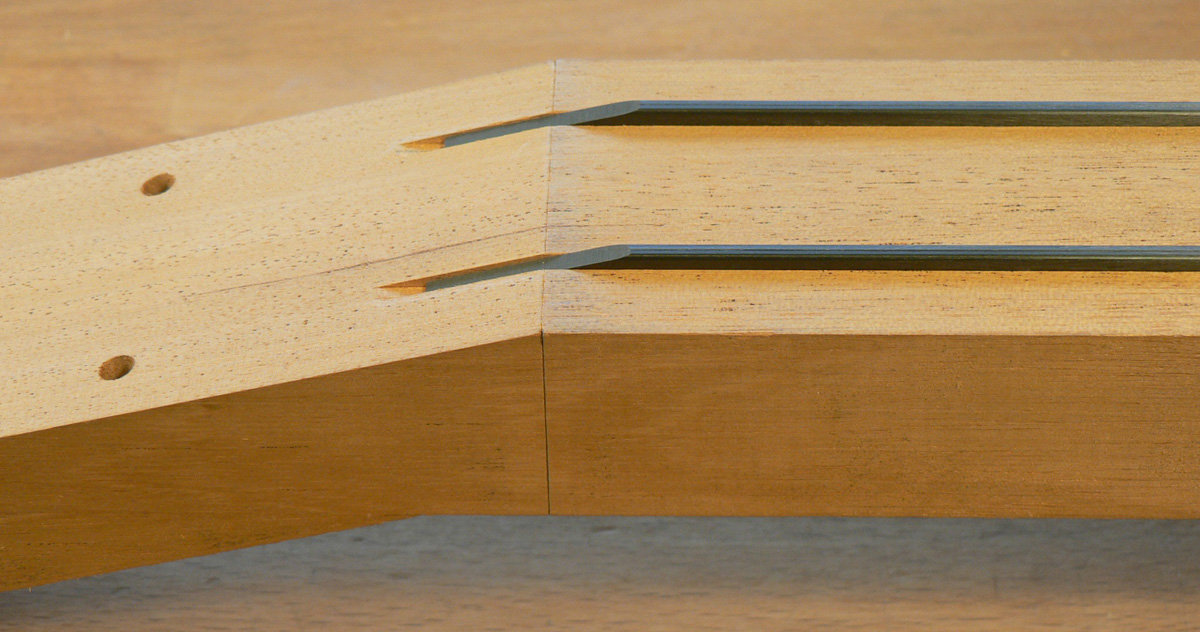
Before gluing the bars in, I needed to route the slot for the truss-rod. I didn’t get that wrong ‘cos it’s in the middle. Here it is with the rod being tried for size.
It’s an Allied rod and they recommend gluing a fillet on top of it, so I made the fillet and masked off the face of the neck blank to reduce the chance of getting glue where I didn’t want it.
Once glued in, I skimmed the fillet down flush with the surface of the neck. Having built mostly electric instruments (basses) and frequented the electric guitar and bass forums I find it amazing the lengths to which those guys will go, building complicated jigs to do everything with a router; especially scarf-jointed headstocks. I just love using a plane with a sharp iron.
I had to glue a couple of wings onto the headstock and they’re glued on like this to match the grain direction of the rest.
Then they got planed down flush to the headstock front. |
|
|
|
Post by lefranglais on Dec 3, 2019 16:34:00 GMT
If you've been following this, you may remember what the tail graft looked like. I decided to make a headstock ‘decoration’ to match. Oh, and this is why the tail graft got installed ‘upside-down’. I didn’t do it intentionally, I just got used to seeing them like this and installed the tail graft without thinking about it and although you can’t really see them both at the same time, in this case it does seem like the ‘right’ way up to me.
Here I’m routing a recess for my pearl logo. If I don’t put it on, people ask me why I didn’t, and say I should have. It’s the famous ‘Keith McKenzie Pantograph’ that you can make yourself, and it works amazingly well. Thanks to Chris Paulick for putting it on his Youtube channel. 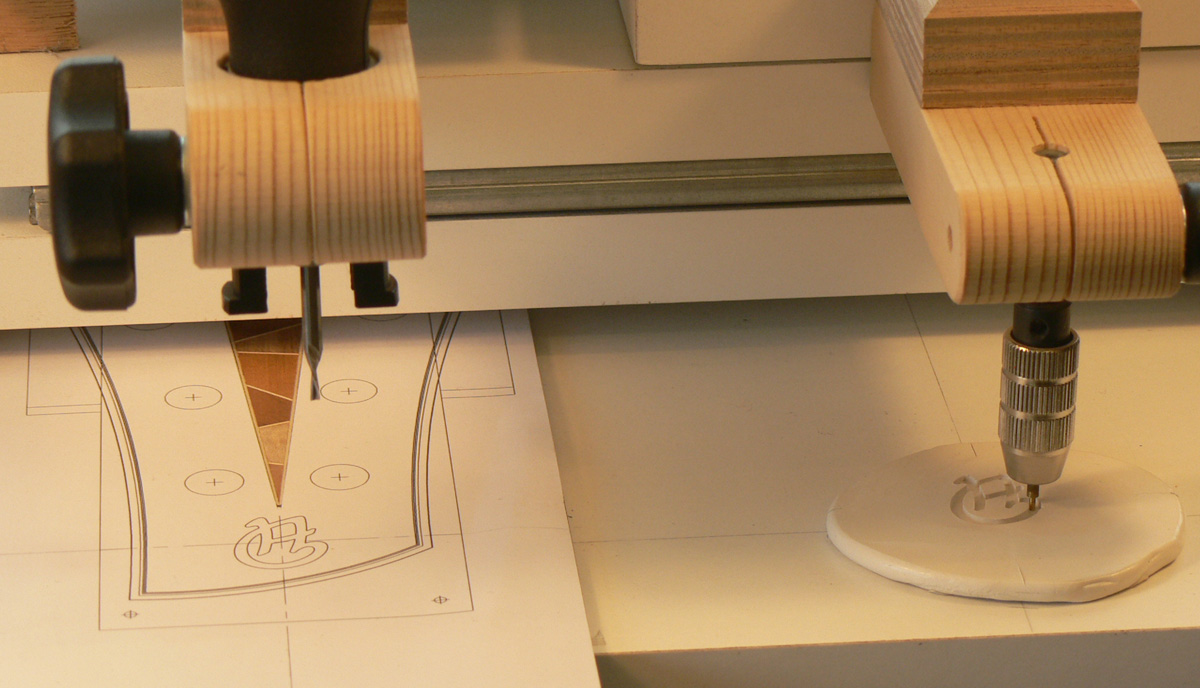
So then I glued the headstock veneer on, cut off some of the surplus and it looked like this.
Off-cuts from the back to make a bookmatched backstrap veneer.
Time now to sand the back of the headstock to thickness.
These are the bits that are going to be glued onto it.
Bending the maple veneer on a hot pipe is easy. Bending a bookmatched veneer 2mm thick isn’t. Of course it came apart, but I managed to glue it together again and it doesn’t show much. And here it’s getting glued in place.
Voilà!
Now I can cut most of the surplus off the headstock. It looks a bit hairy doing it this way but it works OK if you’re careful.
There! It looks like a headstock. You’ve noticed that part of the ‘decoration’ is missing. Well, how else was I going to get at the truss rod? I decided to make a flush fitting cover that wouldn’t be seen as such, so part of the ‘decoration’ wasn’t glued to the rest.
Now I can route the headstock’s finished shape with the help of a template and locating pins. If I make a template from MDF, I soak the edge in CA glue. This makes it quite hard so it isn’t deformed by the router bearing.
It’s going to be a bound headstock so I need to route a ledge for the binding and purfling. I always have problems with this as, when you get to the corners, there’s less than a quarter of the router base in contact with the headstock surface and the slightest wobbles cuts a divot in the ledge.
Now I have a nice clean ledge for the binding and purfling. |
|
|
|
Post by lefranglais on Dec 11, 2019 9:20:43 GMT
Been trying to add a bit more, but Postimage wasn't working. Don't know whether it's Postimage or the fact that we're out in the sticks and t'internet seems to be subject to luck and a prevailing wind. Anyway, it appears to be working at the moment. The binding isn’t going to bend to fit the three tight radii without some help, so this is what I do. I make a couple of male and female forms from MDF. Then I drop a piece of binding in boiling water for a couple of minutes, fish it out, and clamp it between the two forms. Then I put the whole lot into the oven on the lowest setting for about ten minutes and when it comes out and cools down it keeps the shape perfectly. 
The two long pieces bend easily enough, but with the help of another form I glue the purfling to them and they almost keep their intended shape too.
The one on the left is one of the pieces for the curve where the headstock meets the neck. The one on the right is for the end of the headstock. This is the second one I made because on the first one I glued the purfling on the convex side like all the others!
Here are all the bits glued together. I didn’t take any photos of myself gluing my fingers to it. Been there, done that. Have you noticed a difference in the truss rod cover?
You can see it better here. I was intending to hold the cover in place by gluing a magnet to it, which would pull it towards the truss rod nut. But this nut is stainless and must have a high chrome content as the magnet more or less ignored it.
So I had to thicken the cover with a piece of maple with a hole in it which allowed me to glue a magnet solidly to it, and bevelled the edges so that, although it’s not as discrete as I wanted, it still blends in. I then, of course had to glue another magnet into the headstock like so. If you look carefully, you’ll see that the cover is lined up with its recess, but that the magnet in the cover is slightly nearer the nut than the one in the headstock. This means that the magnet in the headstock pulls the cover up into its recess. I wasn’t sure it would really work, but it does. Now, how am I going to get it out? 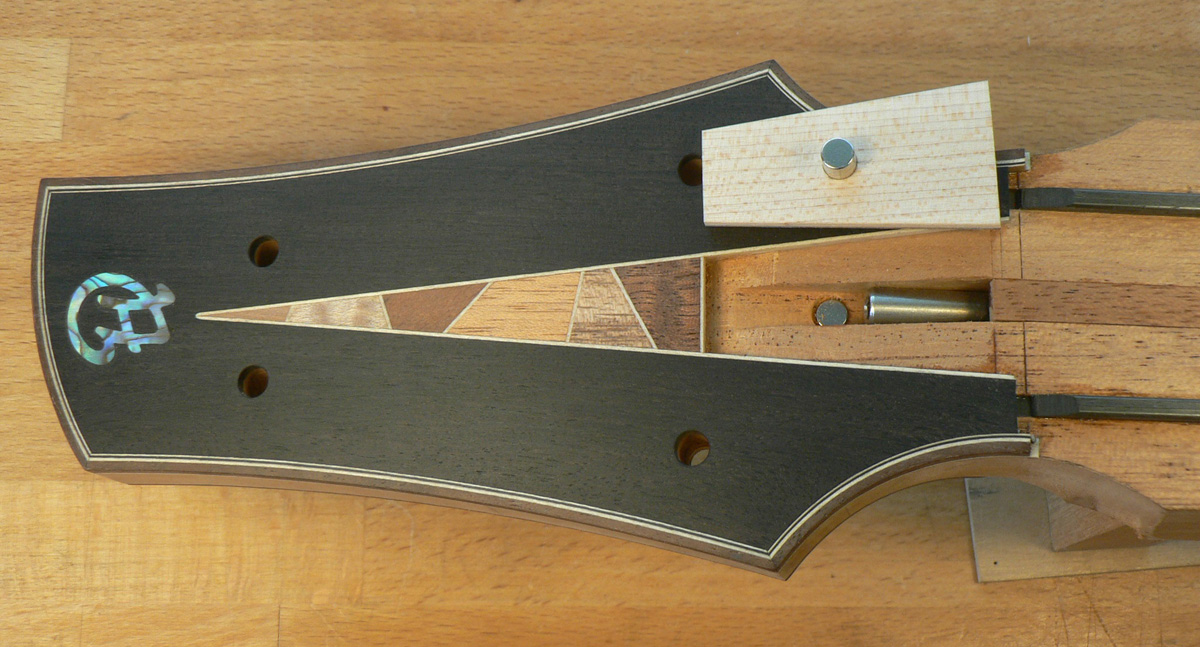
Can you see that little slope I’ve chiselled into the cover recess?
Well, that lets me get it out. Like this. Of course I’ll probably have to loosen the D and G strings, but I never said it was perfect! |
|
ocarolan
Global Moderator
 CURMUDGEONLY OLD GIT (leader - to join, just ask!)
Posts: 35,724  Mini-Profile Background: {"image":"","color":"c0cfe1"}
Mini-Profile Name Color: 182a3f
Mini-Profile Text Color: 733a1c
|
Post by ocarolan on Dec 11, 2019 10:40:10 GMT
Love seeing the elegant ways you and other loofahs solve the problems that crop up along the way.  That headstock is so beautiful. Keith |
|
|
|
Post by lefranglais on Dec 11, 2019 16:56:48 GMT
Thank you kindly sir.
|
|
|
|
Post by Vinny on Dec 11, 2019 17:17:47 GMT
That's a piece of art!
|
|
colins
Luthier / Guitar Maker
Posts: 2,397 
|
Post by colins on Dec 11, 2019 23:01:21 GMT
 Colin
|
|
francis
C.O.G. 
Posts: 2,483  My main instrument is: Whatever I'm building...
|
Post by francis on Dec 12, 2019 17:18:41 GMT
Join Colin with this  &  Francis |
|
|
|
Post by lefranglais on Dec 15, 2019 17:33:29 GMT
Thank you again for the kind words (and gestures) although I don’t really think they’re merited. I’m just an amateur dabbler and I can spend as long as I like trying to get it right, and if I don’t get it right I can start again. I don’t think of myself as a real ‘loofah’.
Oh, and don’t forget that I’ve seen your work up close Colin, and anyone who can sell classic guitars to Spaniards at higher prices than Romanillos . . .
Francis, I’ve seen your work here and on your web page (yes, I’ve been lurking) and it seems to me that you don’t need to take your hat off to anyone, but I do appreciate the gesture.
|
|
|
|
Post by lefranglais on Dec 16, 2019 9:59:40 GMT
Now for the fretboard. I don’t have a template for the fret spacing so I just measured and marked using the Stewmac calculator.
I made the fret slotting jig for two fanned fret basses I made, but it obviously works just as well for parallel frets. After all the slots were cut I ran a triangular section needle file along them a couple of times to create a slight chamfer. It helps the frets go in and reduces the chances of chipping if they ever have to come out again.
The fret slotting jig came from Jeremy D on the Australian/New Zealand Luthiers Forum. The saw blade is held in place by neodymium magnets set into the jig. He explains how tomake one here www.anzlf.com/viewtopic.php?f=24&t=2094
Sanding the radius on the fretboard.
Binding the fretboard.
Fretboard bound to match the headstock. Those whitish streaks are actually brown, but I don’t mind a few streaks in ebony. They make it look like wood rather than black plastic.
Frets installed and fretboard glued on but I didn’t take any photos. I pressed the frets in on the drill press.
Gluing an ebony heel cap. I make the heel cap its finished shape and blend the heel into it. I then carved the neck and completely forgot about taking photos. This seems to happen when I’m really concentrating on the job in hand.
This photo shows how the two brass plugs that sit on the neck adjustment screws are aligned with the centre of the barrel nut holding the neck in place. This means that, in theory, the neck can tilt backwards or forwards without loosening the barrel bolt. We’ll see if it works.
|
|
|
|
Post by lefranglais on Feb 26, 2020 17:16:10 GMT
Well, having got almost to the end of this saga, I seem to have stalled. Sorry about that, but various things seemed to get in the way. But things are looking up, and all being well, I should have a workshop again in a few months' time. So where was I ?. Ah yes, having got the neck to this stage, I could start fitting it to the body, and to do that I had to cut the aperture in the top for the neck extension. I was going to make a router template but finished up just carefully cutting it with chisels etc.
This shows the beginning of the aperture for the heel. Once this was done I could fit the neck by engaging the holes in the neck’s brass plugs with the points on the adjustment screws and carefully scribing around the heel with a craft knife. I then opened up the recess until the heel just fit into it.
After some slow and careful chisel work.
After quite a lot of sanding I could start on the finishing. I finally decided to do the neck in Tru-Oil and the body in French polish. Here I’m starting on the body and it’s beginning to shine.
While I’m applying zillions of coats of Tru-Oil and shellac I can make the bridge.
So I had to saw another piece off my lump of ebony. That involved quite a lot of perspiration as the saw isn’t as sharp as it used to be.
Once I’d got my blank squared up I started on the saddle slot. The advantage for me in using CAD is that having drawn the bridge with the compensated saddle slot, I could draw two tapered cauls at the same angle as the slot. Stick the drawing onto a bit of ¾” MDF and sand up to the lines and my blank is held perfectly at the right angle.
While it’s in there I can drill the pin holes too.
After sawing off the surplus on the bandsaw I sanded a curve onto the top surface. The two triangular blocks are attaché with double sided tape and help me keep hold of the bridge and keep it square to the sanding belt.
After which it looked like this
I then cut out the profile and countersunk the pin holes. Countersink bits have tendency to wander if the surface being countersunk isn’t perpendicular to the axis of the bit and the workpiece isn’t clamped down. So to avoid this I drilled a hole in the board which is clamped to the drill press table and inserted a locating pin the same diameter as the holes in the bridge. Then I located the bridge on the pin to countersink the holes.
And here it is finished.
|
|
|
|
Post by lars on Feb 26, 2020 18:06:22 GMT
This Is such a beautiful build. And one of the cleanest build I've ever seen. I'm green with envy! I'm glad to see the progress!
/Lars
|
|
|
|
Post by lefranglais on Mar 6, 2020 11:19:49 GMT
Thank you Lars. Time to get the story finished. To match the underside of the bridge to the surface of the soundboard, the usual method is to tape sandpaper to the soundboard and rub the bridge on it, but you can’t press too hard and it takes an eternity. So I made a sanding board by sanding a piece of ¾” MDF in the radius dish to form a convex surface and sticking some 80-grit abrasive to it. I rubbed the bridge on this until the whole surface was in contact with it and then finished of with some 400 grit paper on the soundboard.
Only a few fiddly jobs to do now, one of which is drilling the holes for the tuners. I already had 5mm pilot holes drilled using the template, which I had to open up to 10mm diameter. To do this I used a similar method to that for drilling the bridge pin holes. I drilled a 5 mm hole in the base board and inserted a brass dowel which was a nice sliding fit, and then changed the 5mm drill bit for a 10mm brad point bit.
I then located the headstock on the dowel and lowered the 10mm bit which pushed the dowel down and drilled a clean 10mm hole concentric with the 5mm one.
So now I have 6 nice clean holes waiting for the tuners.
Now comes the moment of truth and I can’t put it off any longer. Gluing the bridge. I made a clamping caul as shown. It consists of a piece of 12mm ply with two threaded inserts and two Allen screws. Behind that there’s the off-cut from the bridge with a piece of thick card attached with double sided tape as a sort of cushion. Behind that are two brass dowels which allow me to align this lot with the bridge itself when I actually come to glue it in place. 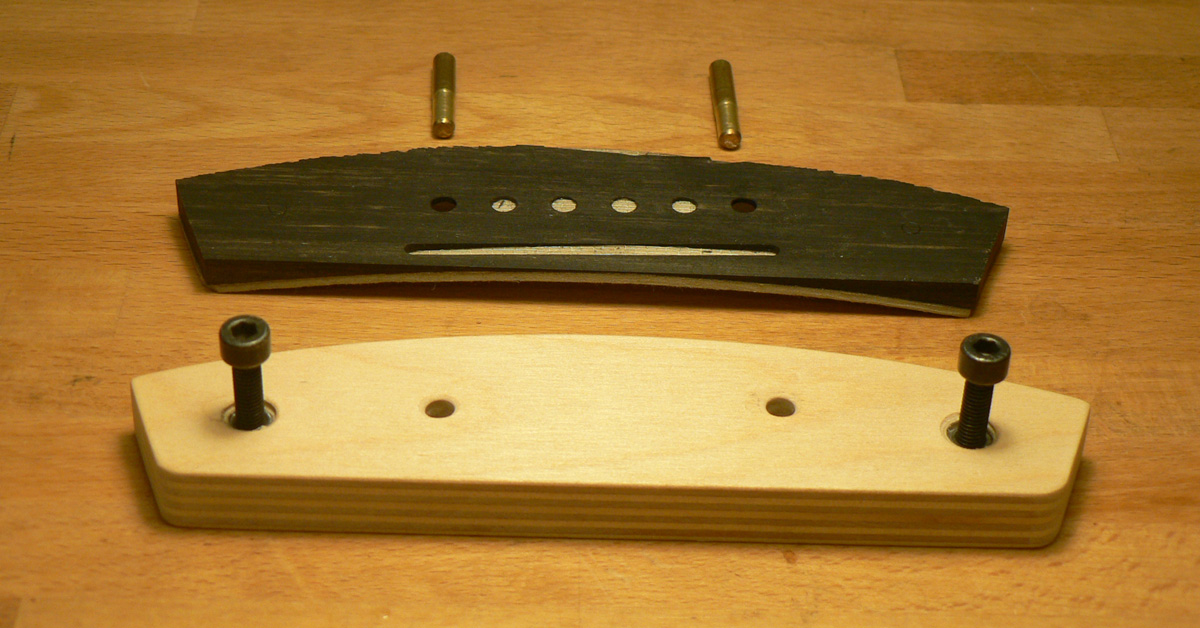
Assembled, it looks like this. The ebony off-cut is so thin in the middle that it’s very flexible, and, once I’ve clamped the caul in the centre I can apply pressure to the ends by turning the two screws.
Here’s a dry run. After measuring and checking 3 or 4 times I scribed round the bridge and scraped the finish off. Not my favourite job, using one of those single sided razor blades as a scraper. I then applied several layers of masking tape around the bridge as a tape-dam and glued it on. I didn’t take any photos. I was a bit too busy.
All that remained was to make a nut and screw all the bits together. I think Stewmac is a great firm with service second to none. But some of the things they sell for quite a lot of money, you can make yourself in a few minutes and for next to nothing. The bridge clamping caul was one example and here’s another, and it worked a treat. 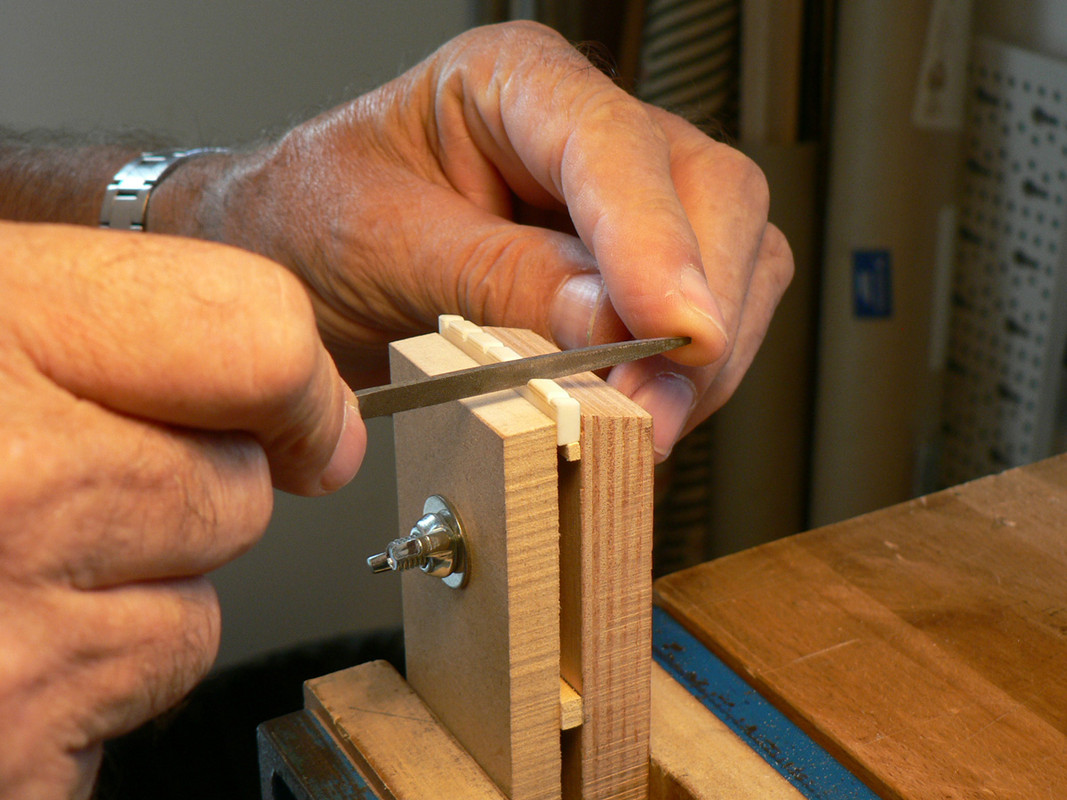
One or two problems cropped up. Even with the two neck levelling screws lowered almost as far as they could go (so the neck almost bottomed out in the body recess) it was still 13-and-a-bit frets to the body and it was supposed to be 13. Don’t know how that happened. But the other problem turned out to be a sort of blessing in disguise. Even after all the measuring and checking, with the neck adjustment as far towards the bridge as it would go, I still had too much intonation. i.e. the bridge was too far from the neck. So I had to deepen the recess in the neck block which was a bit nerve-wracking as the body was finished. Anyway, in the end, when the intonation was as good as I could get it, the 13th fret turned out to be in line with the body junction, which I put down gratefully to beginner’s luck.
So I finally got it strung up and I could hear what it sounds like. Well, at least it sounds like a guitar rather than a banjo. I hear people describing a guitar’s sound with terms like ‘sparkling trebles’, ‘shimmering mids’, ‘growling bass’, etc. and it just doesn’t mean a thing to me. Probably because I’m not a guitarist.
That's all the construction photos I took. So the next post is the finished instrument.
|
|